Get in Touch

Wall Street Journal Article about Online Reviews

When you prepare to purchase something online what’s the first thing you do? If you are like me you head right over to Amazon, search for a product and dive into the customer reviews. The Wall Street Journal today had a great article on customer reviews, some of the highlights:

  • Amazon is tightening up who can leave reviews by requiring an account to have spent at least $50 on a credit card prior to creating a review.
  • 5 star ratings aren’t necessary, the most purchased items typically fall into a 4.2 to 4.5 star range
  • Negative reviews are expected by shoppers, it’s ok to have them with all the positive reviews as it conveys legitimacy
  • Creating customer loyalty programs is a great way to encourage reviews (both positive and negative)

Adding customer reviews to your store is pretty straightforward in Shopify or Woocommerce. A popular app that we have installed on Shopify is Yotpo Reviews, they also have a plugin for Woocommerce.

Consider offering gift cards for reviews post purchase. We have setup automated emails for customers that go out 20-30 days after the order is placed and ask the customer for a review. You can mail out a gift card to Amazon, Starbucks etc, and encourage your customers to leave reviews on your site.

How to Improve Product Search on Shopify with Variants and Meta Fields

What was the business problem that the client faced?

One of our clients, windfalllumber.com, has dozens of variants of products which differ mainly  in color only. They wanted to improve the search ability on their site so that when a visitor searches for a particular color, all relevant results are returned. Also, the client wanted the search results to display individual variants, not simply their parent product, which is the typical Shopify search result.

Shopify by default only searches the product title and product description. This could cause a problem (no or incomplete results) if , for instance a visitor searches for “green” and the parent product of a “green” variant does not have “green” in the title or product description.

They needed a way to tag their variants according to likely color search keywords. Shopify does not provide the ability to assign tags to their variants, only the parent product. They needed an app to replicate the ability to add tags to variants.

MetaFields Editor by Webify Technologies

MetaFields Editor is a FREE and simple to use app that we frequently use as a general problem solver where Shopify does not allow the ability to add metafields (additional data) to a product or variant within the dashboard.

Within the app (screenshot below) we were able to add variant “tags” to specific variants that are helpful to pinpoint a variant during a search on the site. These are not only likely color keywords, e.g. “red, auburn, etc…” but other descriptive terms for texture, e.g. “smoothe”, or the variants practical use, e.g. “walls”.

metafields-editor

Metafields Editor does NOT work with Shopify’s search automatically. Custom coding needed to be added to the search results to search and filter by variant tag. However the alternatives to tagging variants by way  of metafields were far messier and utterly impractical for a variant search to work.

Consider another possible use for this app. In the Shopify dashboard, for any product you can only enter data such as title, description, sku, weight, collection and a few other items. However what if each of your products has an MSDS (material safety) pdf associated with it? Where would you enter the link to each product’s pdf in the dashboard? In the product description? Perhaps, but that’s not ideal.

With the Metafields Editor, you would simply go to the app, select the product (or variant) you wish to add the pdf link to,  and then add a namespace, select a value type, add the key of the metafield- “pdf”, in this example- and the value of the metafield – a url to a pdf file on the server.

In your theme’s templates, metafields values can easily be retrieved using roughly the following liquid syntax: {{ product.metafields.namespace.key }} or {% assign someValue= product.metafields.namespace.key %} or

{{ variant.metafields.namespace.key }}

What other apps did you look at besides?

There are other metafield apps out there such as Product Metafields +   and Metafields2. Both of these are premium yet affordable apps. They could no doubt allow us to solve our variant metafield problem and have a few more custom features than Metafields Editor. However once again, Metafields Editor is free and simple. When we can solve a problem using something that is simpler, we go with simpler.

Did you consider building something custom in the liquid template?

As mentioned above, we did need to considerable coding in our search results template to use these new variant tag metafields to produce relevant results.

In our code, we had to first off, query for all of our stores products. As we ‘looped’ through each product, we had to loop through each product’s variants. With each variant, we checked against the variant’s metafield whose key is “tag”, and then checked to see if the value of that metafield contains the keyword from the user’s search (whatever the user entered into the site’s search box). If there was a match for any particular variant, we displayed the variant’s featured image and title with a link to the parent product’s page with the variant’s id affixed to the url.

This is quite a departure from Shopify’s typical product search, which typically displays only the parent product of variant that matches the search, but not the matching variant itself.

Did the app solve all of the client problems? Any issues once you setup?

In summary, we were able to provide for the customers request: to search for individual variants by way of variant “tags”. The only issue for our client and any of our client’s who’ve used this metafield app, is that they cannot simply add the metafields to the products or variants directly in the Shopify dashboard under the product edit pages; it involves an extra step. Perhaps someday Shopify will finally add the ability for shop owners to do that. Metafields for products and variants do exist behind the scenes, but you have to use an app to add and edit them.

Urban Smart Bellevue

We recently undertook and completed a large project for the City of Bellevue and Puget Sound Energy called Urban Smart Bellevue. The Urban Smart campaign was created to raise awareness about energy conservation for businesses in metropolitan areas. Our ultimate goal for the project was simple: take a design and turn it into a functioning website. However, with most large scale projects, there was a lot of coordination and communication needed to complete the site.

urbansmartbellevue

The Design

After we received the design, we created a development site on our server with a fresh WordPress installation and starting chopping up the design files. We went through our normal process of starting from the top down on the design, from there we decided to take a look at unique features of the site that would require extra time to implement.

The Animated Graphic

The most unique feature on the Home page was the third section down labeled, “Energy-saving actions, powerful results.” We took this photo from its .jpg format and sliced each individual piece out into it’s own .png. Then, using some jQuery, we set a scroll point so when the viewer reached a certain point on the page, the images would start sliding into place. To create the sliding effect, we primarily used CSS transitions and absolute positioning. The only Javascript we used was to start the sliding action, set timers on each image to dictate when it would start to slide into place, and then update the absolute positioning to determine the end position of the image. Using the opacity, transition, and absolute positioning properties of CSS is what allowed us to create the fade-in and sliding effects on the images.

The Custom Posts

We added a slideshow plugin and then used a parallax jQuery plugin to add the parallax effect on the image above the footer. The rest of the design for the Home page was pretty straightforward. One of the more complicated aspects of building a site for a client is to create ways for them to easily input new content to the site without needing any coding experience. While WordPress provides a great interface to do this with standard page templates, when you are working with a custom design where  you can’t just place all of the content in a block of text, you need to get a little creative with plugins or your code.

One of the sections on the Urban Smart site where we needed to add some custom content management was in the Upcoming Events and News Feed sections. The content in these sections is updated in one section of the WordPress dashboard and then automatically updates both the Home page as well as the News and Events page. We did this using a custom post type plugin which generates a new tab in the dashboard for News and Upcoming Events. From there, the client can easily input new content and that content is added to the site when they update.

The Stuff Behind the Scenes

(you can skip this section if you aren’t interested in how this is done)

When we use the custom post type plugin. Essentially what we are doing is using the plugin to create a new post in the database with a unique post type. In this case we used it for the Upcoming Events and News Feed post types. Each of the post types has custom fields that are associated with it. So when the data is stored, it is tied to to the specific post type. When you want to output this data, you will need to query the post type by creating an array that stores the post type information and a loop that cycles through the array. Within the array, you can apply parameters to filter the data as needed such as the number of posts that are returned in the array, the ordering of the posts (ASC, DESC, etc.), as well as custom fields within the post type.

Here is an example of an array and the query:

$args = array('post_type'=>'custom-post-type', 'order' => 'ASC', 'posts_per_page' => 3);
query_posts($args);

Once you have created your array and loop, you will need to call the custom field data within the loop using the get_post_meta WordPress function. Here is a sample of code that we used to store the data for the location of an Upcoming Event:

$time = get_post_meta($post->ID, 'wpcf-custom-field-slug', true);

This PHP variable stores the value for the specified custom field which you can then add to your HTML to dynamically output the data as you can see in the Upcoming Events section of the Home page.

about-us

The Back Pages

After we finished the design for the Home page, we needed to finish designing the back pages. These pages were, and generally are, less sophisticated and complex than the Home page. However there was still some customization needed to meet the design. As mentioned earlier we needed to use the News and Upcoming Events custom post types to update the content on the  page. We also needed to create some custom fields that would appear on the About Us and the How it Works pages. To make the content easy to update, but still fit the design, we needed to use custom fields for the different sections of the pages. If you look at the About Us page, you can see how the content is split into two section, the top section with the white background, and the lower section with the blue background. In this case, we needed to create two separate content sections in the dashboard where the client can add content for each section. We also needed to create custom page templates for each of the pages since they each have a unique design. With a simple site, you can generally just use a default template for the back pages as they will all look the same structurally and just the content itself changes from day to day. With this site, the design was intended to make each page stand out in its own way. Generally, the more complicated the design, the more you will need to use custom fields to simplify the content management for a non-technical client.

The Responsive Design

As with all of our sites, we needed to make this site responsive. However there was a little more pressure to get the design right with the Urban Smart Bellevue project because we were provided with such a detailed design for the full site, but we weren’t given any information for the responsive design. Luckily, we are rarely given a responsive design so we have a lot of experience converting a desktop design of a site to the mobile version without much instruction. Sometimes when you are reducing the size of the screen, you as a developer have to sacrifice some of the content as it won’t all fit in a mobile design. Fortunately for us, the design we were given was designed in such a way that we were able to fit all of the content into the responsive design. Check the site out on your phone or tablet and see what you think of our responsive design.

The Summary

We managed to finish the site in time for them to launch their campaign. There is always a sense of accomplishment when you finish any project, but this one was a little more special than normal because it was a big project for a big client with a small amount of time to launch the site.

Starting Your Online Business With Shopify

When starting your online business, there are many things to consider. One of the most important decisions you will make is which platform to use to create your online store. Shopify is one of the most widely used eCommerce platforms for many reasons, but one of the main reasons is how easy it is to get your store up and running.

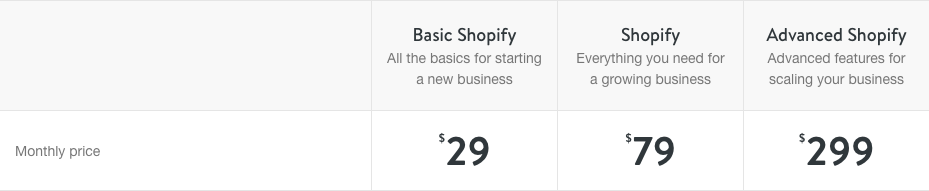
When you sign up for Shopify, you are given a free 14-day trial so you can experiment with the interface. This trial period is great for testing out themes, adding products, and testing apps before committing to using Shopify. After the trial period, there are three different plans that Shopify provides.

shopify-pricing
  • Basic Shopify– This plan has the cheapest monthly rate and comes with the least amount of features, but could be the best plan for you when starting your shop if you are not ready to fully commit to Shopify.
  • Shopify – This is their standard plan that comes with additional features like Abandoned Cart Recovery which allows you to see which customers had products in their cart, but didn’t go through with the checkout process.
  • Advanced Shopify – This is the plan that has everything. This plan comes will all of the Shopify features and is great if you are selling and shipping products in high volume.

There are other plans that are available if you have specific needs for your shop, but these three are the most commonly used. Here is a full list of the pricing plans and the features they come with.

Once you have selected your plan, whether it is the free-trial or you have decided to commit to Shopify and go with one of their paid plans, there are a few more steps you need to take to get your store up and running.

Select a Theme

By default, your store comes with a barebones theme called Launchpad Star. However, you might want to select a theme that has already been developed and comes with built in features that will make it easier for you to change things like color and layout. There are so many Shopify themes available that it came seem a little overwhelming when you look and see how many there are. However right off the bat, you can decide whether you want to use a free theme or a premium(paid) theme. The free themes are great and will work as a quick and easy way to make your shop look presentable, however most of them don’t come with all of the bells and whistles of a premium theme. You have to pay for the premium themes for a reason. Most of them come with support and have a lot more features than the free themes.

Once you have selected a theme, you can start adding products to your site.

shopify-products

Adding Products

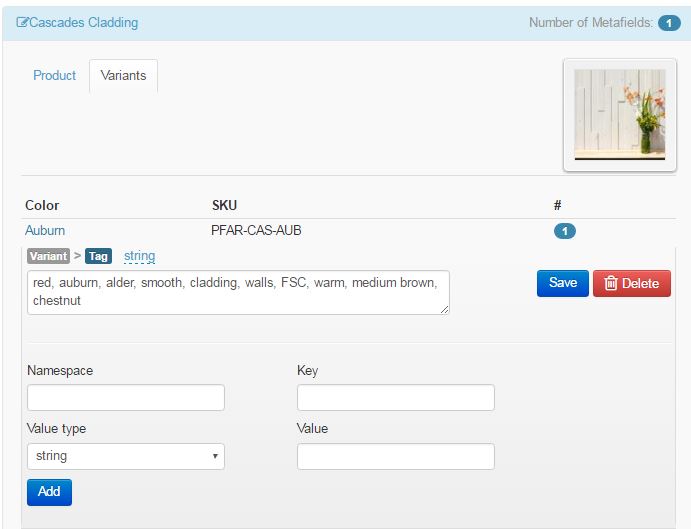
Now comes the fun stuff! Adding products to your site is easy with Shopify. You can create collections, or categories for your products to make it easier for your customers to find what they are looking for. You can also add variants for different colors, sizes, prices, etc. for your products. When adding products, make sure to fill out as much of the information as possible because it will make everything easier for you down the road once you start selling products and you have to track inventory, adjust shipping costs, or any of the many things that can change as your business grows.

Now that you have added some products for your customers to purchase, we can get into some of the more complex aspects of Shopify.

Installing Apps

Shopify Apps are tools that other developers have created to make your life in Shopify easier. Much like the themes, some of them are free and some you have to pay for. There are apps for marketing, shipping, social media, pretty much anything you can think of for your store. As you are searching through the apps, be sure you know the cost of the app. Some of the apps list a price range or provide a free trial and then charge you after the trial is up.

Viewing Your Shop

Once you have your theme, products, and apps installed on your store, you can go to your shop see what it looks like. Assuming you haven’t added a custom domain and your shop is still in test mode, you can view your site by clicking the button at the top of the dashboard navigation next to the Shopify logo. Shopify will provide you with a domain for you shop, something like shop-name.myshopify.com. Don’t be alarmed when your shop doesn’t look quite like you want it to! You can make a lot of customizations on your own in the dashboard without having to do any coding.

customize-theme

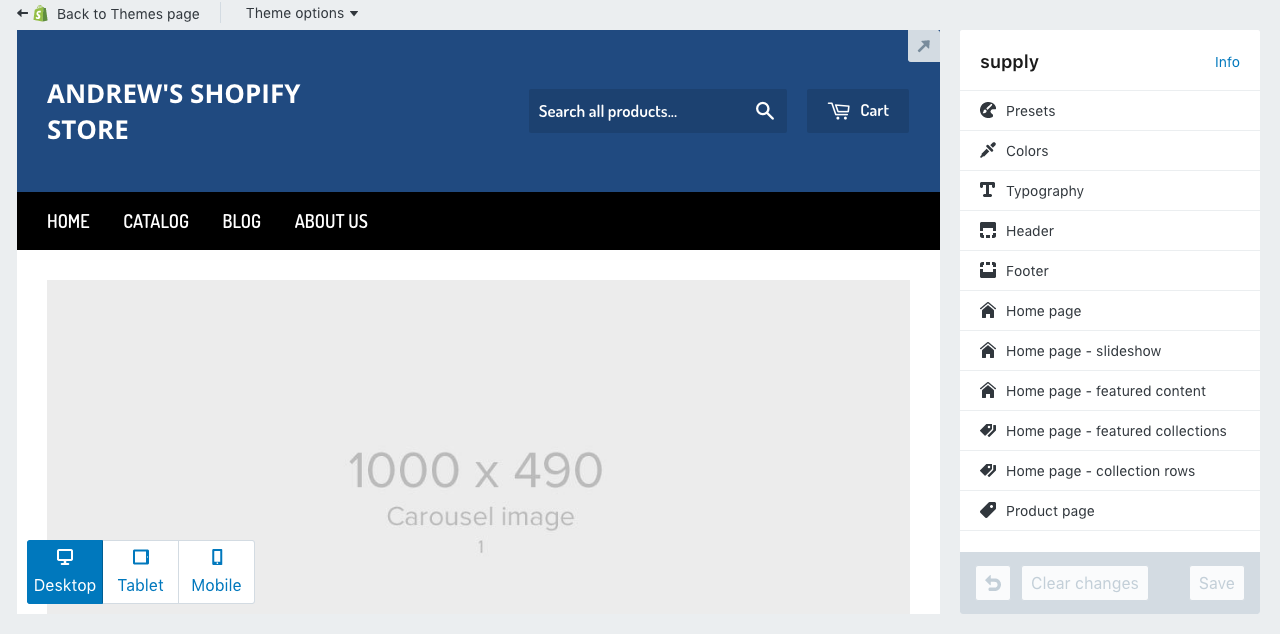
Customizing Your Theme

Now that you have seen your shop and the framework for what it will look like, it is time to make some basic customizations. In the Shopify dashboard, you will need to navigate to the Customize Theme section. To get there, select the Online Store button from the left menu, then click the Themes link. You will see a preview of your theme with some options above it. Click the Customize Theme button. Here you can set colors, add a logo, and make several more modifications to your site. Each theme is different so you will have to click around to see what you are able to customize. You can also install new themes without losing your existing products and apps so don’t hesitate to try a new theme if you feel like you might not like the theme that you initially chose.

Launching Your Store!

The moment has finally arrived! You are ready to start reaping the benefits of your hard work and selling your products to the masses!

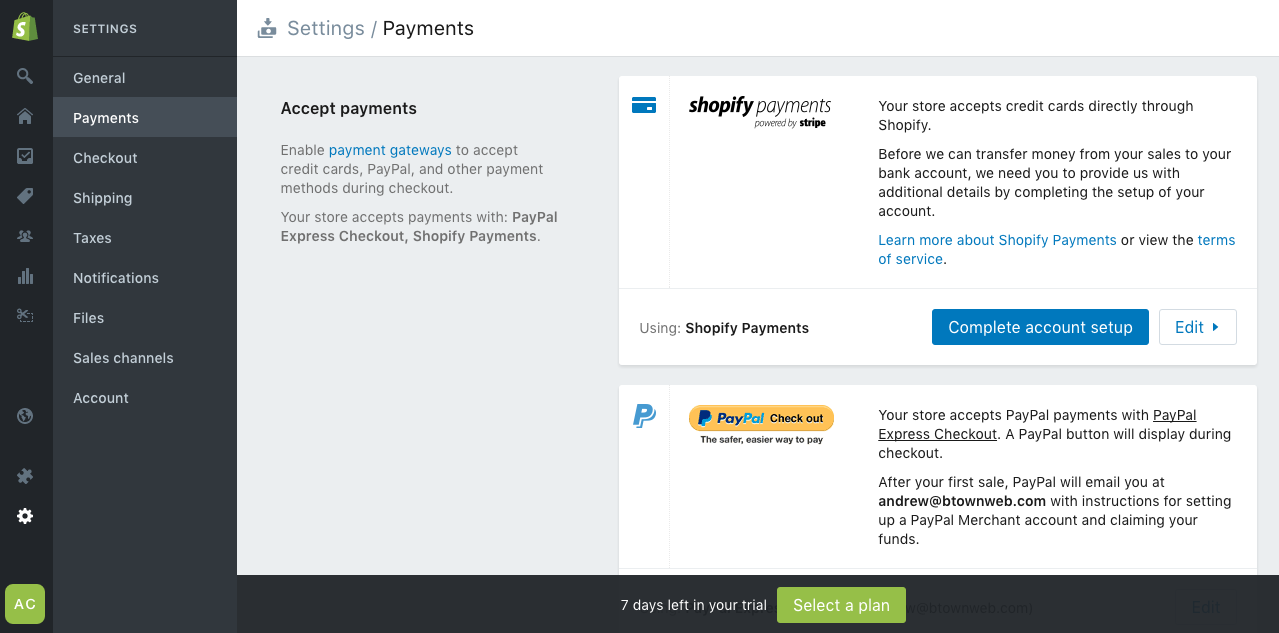
First though you do need to go through the final set up process with Shopify. Click on the Settings button on the main Shopify navigation menu. Here you will see a list of all of the different settings that are preset on your site. We would highly, HIGHLY recommend going through each of these settings and at least taking a look to make sure that the information is correctly filled out. After you have ensured that you have the correct information entered, you will need to decide whether to use a separate payment processor, or Shopify payments. If you use another payment processor, you will need to set up an account with them and tie it to your Shopify store. If you decide to use Shopify payments, you will need a checking account where Shopify can deposit your revenue. Ultimately the decision is up to you, but using Shopify payments makes things a little bit easier as you won’t have to manage a separate payment processor, it will all be managed under your single Shopify account.

Once you have set up your payment processor, you are one step closer to selling your products and services online! You will need to take your shop out of test mode in order for customers to finalize the transaction. To do so, you will go back to they Payments section under Settings and make sure that the Test Mode button is not checked.

shopify-payments

Setting a Custom Domain

Now that you can actually sell products, there isn’t anything else that you HAVE to do immediately. However we definitely would recommend using a custom domain as it makes your website more identifiable and makes your business seem more professional. To set your custom domain, you can either register through Shopify or through a separate registrar like GoDaddy. Once you have decided who your registrar is going to be, click the Online Store button again in the dashboard and select Domains. Here you can either purchase a domain, or add a domain that you have already purchased through a separate registrar. If you are adding a domain you have already purchased, you will need to set the DNS to point to your Shopify store. To do so, follow the instructions provided by Shopify. You may need to contact your registrar as well for instructions on how to update the DNS. Once you have updated the DNS, it can take up to 24 hours to propagate, but is generally much faster than that.

Selecting Your Plan

This is the final step in getting your shop set up. You will need to select a Shopify plan. If you go to Settings>Account in the dashboard, you will see where you can change your plan type and add a credit/debit card. Once you have selected a plan and entered your card information, that’s it! You are ready to go and can start selling to customers!

Although your shop is set up and accessible online, there is so much more that Shopify can offer to enrich your customer’s experience. It would take a year’s worth of blog posts just to scratch the surface of what Shopify can do. As Shopify Experts, we are here to help you unlock the full potential of your store. Just go to our Shopify page and let us know what it is that you need!

Becoming a Shopify Expert

As the online retailing market continues to grow, so too does the demand from our clients to create an online store for their businesses. While we are very confident in our ability to create an e-commerce store that not only looks amazing, but is equally as functional, we wanted to take our e-commerce skills to the next level, particularly with Shopify.

Shopify has a program called Shopify Experts. In order to become an Expert, you must submit an application containing 5 stores that you have created as well as descriptions and code examples of the work. This seemed like the perfect opportunity for us to not only prove to ourselves what we already knew, but to also gain certified validation that we are indeed Shopify Experts.

As part of our application, we had to decide not only which stores to include, but what specific examples of code we wanted to show Shopify to prove our expertise. Here is one example from Oxygen Plus:

The client didn’t like the default image swap or lightbox treatment of images on the single product page so we just adapted and recreated it for jcarousel.js

<div class="jcarousel">
<ul>
{% for image in product.images %}
<li><img itemprop="image" src="{{ image | product_img_url: "large" }}" alt="{{ product.title | escape }}" /></li>
{% endfor %}
</ul>
</div><!-- end of jcarousel -->{% assign numImages= product.images | size %}
{% if numImages > 1 %}
<div class="jcar-controls">
<span class="jcarousel-control-prev jcar-control"><span class='arrow'><img src="{{ 'jcar-nav-left.png' | asset_url }}" /></span><span class="symbol"><img src="{{ 'jcar-nav-o.png' | asset_url }}" /></span></span> <span class="jcarousel-control-next jcar-control"><span class="symbol"><img src="{{ 'jcar-nav-plus.png' | asset_url }}" /></span><span class='arrow'><img src="{{ 'jcar-nav-right.png' | asset_url }}" /></span></span>
</div>
{% endif %}
</div>
<!-- end of jcarousel -->

What this code is doing is mixing the liquid code of Shopify and adding in some jQuery to create a carousel of images. The initial statement is creating a list using a for loop to display the images. The outer div with the class “jcarousel” indicates to the JavaScript that this is going to be the carousel. The next statement looks at the total number of images in the carousel and then checks to see if there is more than one image displayed. If there is, then the carousel navigation buttons are displayed as well.

While Shopify has a ton of very cool features right out of the box, there is always going to be something that the client requests that is not provided by Shopify so you either need to find an app that will do it, or create it yourself. In this case, we decided that we could create it so we put our Shopify expertise to work and created a nice jQuery carousel for our client.

One great thing about using Shopify as an e-commerce platform is that they store a lot of your product information behind the scenes, so you just have to know how to access that information to add special features to your store. On our site, Seattle Cedar, we have a minimum purchase price to receive free shipping. We wanted to create a way to notify our customers when they add a product to their cart if they were below the minimum purchase price for free shipping and how much more they would need to add to become eligible.

Here is the code that we implemented:


{% capture carttotal %}{{ cart.total_price | plus: product.price }}{% endcapture %}
{% assign carttotal = carttotal | plus:0 %}{% if carttotal and carttotal < 25000 %}<div class=”free-shipping-notice” style=”display: none;”>Your cart total is {{ cart.total_price | plus: product.price | money }}, to qualify for Free Shipping, you must add {{ “25000” | minus: carttotal | money }} to your cart.</div>{% endif %}

What this code is doing is pulling the current cart price and storing it in a variable. Then it adds the current product price to that variable. After the cart and product price are totaled, we compare that number with the number 25000 which represents our minimum purchase price. If the value of ‘carttotal’ is less than 25000, then the notice is displayed notifying the customer that they are currently not eligible for free shipping as well as how much more they would need to spend.

These are just a couple examples of the many ways that we have been able to apply our expertise within Shopify to meet a client’s needs. Our ultimate goal is to help clients to create successful online stores and becoming Shopify Experts is another step towards that end.

4 Content Marketing Tips for your Seattle Small Business

You know that you need to start marketing your company, but where do you start? Follow these 4 tips and you will become a savvy content marketer in no time.

Create a Content Strategy

As a small business it’s important you take time to craft a content marketing strategy. For example, what type of content do you want to create? I was talking to an orthodontist in Tacoma the other day and he was in the process of formulating his content strategy. He decided that he needed informational guides about the types of dental procedures he performs and in addition he wants to start blogging regularly.

What can you write about that will set you apart from the competition? What is special about your business that you want the world to know? Think about your secret sauce and what you are passionate about in your company. Why did you start the business in the first place? If you can start answering these questions, you can write about your journey. After some introspection, your content strategy will start to fall in place as you write about what you know.

Set a Budget for your Writing

If you want to do all the writing in-house your incremental hard costs will be minimal. However you do need to consider your time and think about when you plan to do your writing. You want to create a report that describes a new product you launched, when will you schedule time to write that? Set aside hours each week (or even 30 minutes each day) and you will start seeing immediate results.

Too busy with your day to day work to spend time writing? You can outsource your writing projects to a 3rd party company, use a writing marketplace or look on Craigslist for a writer. Set a budget each month and use that money to create blog posts, rewrite product descriptions, craft white papers or whatever content makes the most sense for your Washington state business.

Track Your Content

What content is generating the most visitors? Which articles got you the most leads? It’s important that you setup the correct tracking to get the best results. The very first step is to make sure that Google Analytics is installed on your site. Google Analytics is free and will track all the visitors that come to your site so you can see where they are coming from, how long they stay on your site and the specific pages they visit. To learn more about Google Analytics, check out this write up we did.

When you have Google Analytics installed you can set up goals to track certain events that happen on your site. Do you want to know how many people filled out your contact us form? If you are a lawyer in King County and are starting your content marketing program, it would be useful to know how many people are reaching out and emailing you to find out more about your services. With a goal on your contact us page you will know where that person came from and if your new content brought in that new potential customer.

Don’t Forget to Share Your Content

When you roll out a new blog post on your site, your work is not done! It’s important that other people find out about what you have written. Do you have social media accounts? Are you active on Facebook? If so you should share your latest blog post there or even better, do you have a LinkedIn Account? You can write your articles and post them on LinkedIn. You want to get publicity for your content so other people can start sharing it. The ultimate goal is to get other web sites to link to your content. For Google a link is a vote for your content and the more votes you get, the higher your content ranks in Google. The higher your content ranks, the more traffic your site will get!

How to set your Shipping Rates by Zip Code in Shopify

When we launched our first Shopify store I thought it would be easy to setup shipping rates by zip code or county. Unfortunately Shopify only lets you set shipping rates by state with their default pricing plan. Our initial workaround was to give customers a coupon code for free shipping. As long as they entered the coupon code upon checkout they received free shipping for their items. In year 1 for Seattle-Cedar.com this worked out just fine as we only shipped to primarily King and Snohomish counties and most of our customers were able to figure out how to get free shipping.

We are entering year 2 of our online store and the goal is to expand our shipping footprint. However, we knew that using the coupon code to give free shipping to our customers wasn’t going to scale. There are 2 main problems:

  • If you use the coupon code for free shipping then customers can’t use additional coupon codes (Shopify only allows one coupon code to be used per order)
  • Using the coupon code for free shipping is a bit clunky, customers expect to receive free shipping in certain areas and don’t want to be bothered entering in a coupon

We knew there had to be a better way, so the first option was to call Shopify and ask for help. When we called up Shopify, they let us know that if we paid our entire monthly charge 1 year in advance they would give us the carrier calculated shipping feature in our account. This feature is mandatory if you are using UPS, Fed Ex or other third party shippers to deliver your product. We do our own shipments at Seattle Cedar, so we didn’t need this feature to calculate 3rd party shipping rates, but we did need the ability to set prices by zip code.

NOTE: If you don’t get the answer you are looking for the first time you call Shopify try again. It took us 3 different calls to support before they offered us the option to pay the annual fee, get carrier calculated shipping and then sign up for the Better Shipping app.

Better Shipping App

Now that we had carrier calculated shipping enabled Shopify suggested that we purchase the Better Shipping app to allow us to set pricing by zip code. The Better Shipping app is pretty much a must have for companies that want to set discrete shipping prices, and works great if you need any of the following:

  • Needs to set individual shipping prices for every product
  • Needs to set tiered (multiple) shipping prices for every product
  • Has multiple drop shipping suppliers who charge different shipping rates
  • Needs to charge additional postage amounts to specific areas and locations
  • Needs to restrict postage to ONLY specific locations
  • Or if you want the flexibility and availability to take full control over your Shopify shipping

Within the Better Shipping app you will want to fill out “Delivery Areas” and include the shipping zip codes for each of the areas you plan to ship to.

Screen Shot 2016-02-25 at 5.52.09 PM

You also have shipping rules that you can create, here are some of the examples that they provide:

  • If a total cart is above $50, shipping is free.
  • If a total cart is between $10 and $20 shipping is $5.
  • If the total cart weight is over 10kg (22lbs) then shipping is free.

Overall we found the Better Shipping app worked just great to finally let us set our shipping rates by zip code, we recommend it!

Things to Consider Before you Launch Your Online Store

You are ready to sell your products online and want to get started, but where to begin? Are you the manufacturer of your products or are you planning to resell someone else’s products?

Creating Your Own Brand

If you have your own product that you manufacture it’s much easier to get started selling online. For example if you create custom jewelry and want to sell that through your online store, you are able to set your own price because you know how much it costs you in time and materials to make each piece. With your own product not only can you control pricing, but you control inventory. If you are the manufacturer, you know how much product you need (or have a good idea) during your busy seasons so you can stock up and be prepared when the rush hits. When you manage your own brand, there is no limit to the different types of advertising you can try, all of the following could be appropriate and work well: newsletters, pay per click advertising, content marketing, email outreach and much more.

Becoming a Reseller

You can resell another manufacturer’s products online, but you have to understand the rules of their wholesale arrangement. There can be a number of stipulations/rules with a wholesale agreement, here are some examples:

  • You are only allowed to use certain photos on your site
  • You are limited to certain types of advertising
  • There are pricing restrictions, both floors and ceilings that you must abide by
  • Inventory restrictions, you may be limited on how much product you can sell

If you can successfully navigate the rules for a reseller there is plenty of money to be made. It’s worth testing out a few different manufacturers to see which ones stand behind their product and do what they say they’re going to do. After a while if you develop a level of trust, being a reseller is a great way to create a business online.

Don’t Send Your Traffic to a 3rd Party

I got a call yesterday from someone that was just getting started with selling online. They had a created an account at a popular t-shirt site, TeeSpring and were starting to send traffic to their Teespring.com/store URL. They had created a Facebook advertising account and were sending Facebook traffic directly to their TeeSpring URL. This person asked me why did I think the traffic they were sending wasn’t converting? I told them the number one issue was that they were sending traffic to a 3rd party site and not to their own brand. Why is that an issue? I could see on the top of the landing page, there were plenty of links to the main TeeSpring site and once a customer is off your landing page, they are going to navigate the store and buy shirts from other sellers. You are helping TeeSpring by driving sales to their main site and doing very little to build your own brand.

Use Your Own Domain Name for Your Online Store

If you are creating your own product or plan to be a reseller, it’s an absolute must that you register your own URL. We recommend using GoDaddy as a registrar, they are easy to work with and have a simple interface for controlling your domain name.

Where can you find Dropshippers?

Looking for a product to sell? The first place to start is by using Google, searching for products you like and then clicking on the company website to find out if they offer wholesale arrangements. There are also 3rd party sites that specialize in aggregating dropshipper information, here are a couple:

Looking for Excess Inventory or Liquidation Sites?

Another option is for you to purchase excess inventory or find inventory that a retailer no longer wants and purchase it at pennies on the dollar. There a number of sites that have sprung up to accommodate the excess inventory market, here are a couple that we like:

Any questions on how to get started, drop us an email or give us a call and we can help!

Websites for Seattle Area Dentists

A great friend of mine Justin was in the process of buying a new dental practice and he knew that they needed a brand new website. The old site was built in the late 1990’s and it showed! It was your typical brochure ware with limited content and the design was outdated. After a few discussions we agreed that a new site was needed and to do this right, we needed a custom design.

Initial Website Planning

When customers come to their site for the first time, we wanted to show off the building, the landscaping, and most importantly what it looked like inside the office. We wanted potential customers to also see the dentists so they can get comfortable that these are real people in a great location. Before we started on the design we needed high quality photos! Justin’s wife Jenny took most of the photos and as you can see below in the design they came out great.

Logo Design for Dentists

Their old logo wasn’t indicative of their business and we needed something subtle and more modern.The final logo is shown below in the top left of the home page and it came out great!

Custom Website Design for Seattle Area Dentists

We didn’t want a cookie cutter site for Issaquah Dental Arts, we wanted something that really stood out and conveyed quality. Issaquah is a well to do community in the eastern suburbs of King County and it was important that our site be very professional looking to cater to their potential customers. I worked closely with my designer to get inspiration from other sites, but really create something visually appealing, yet unique. When we created the initial home page design we showed Justin and he was very happy. There were a few tweaks we needed to make (the video on the right hand side was added later) and the top navigation sections went through a few different iterations until we finally settled on the look we all liked. The output of the home page design was an Adobe Photoshop file that then could be coded into CSS and HTML.

Dental Procedure Pages

The dentistry offered many different types of services, everything from teeth cleanings, cosmetic work, implants, pediatric dentistry, fillings, oral cancer screenings and crowns. It was important to explain the work that Issaquah Dental Arts could provide so we created discrete pages for each of these services. There is also a lot of technology in their dental office, they have a digital X-Ray system, a Digital Impression system for capturing the shape of teeth and most importantly an in office crown system so that you can get your porcelain crown done in just one visit (normally it’s 2, one for the temporary and another visit for the permanent one).

Dental Patient Forms

A new patient form is typically very long and can take you 20-30 minutes to fill out the first time. This is aggravating for the user and it generates more paperwork for the dentist office. The goal was to create an online form so that users could fill out the information at home prior to their first visit and once the data is submitted Issaquah Dental Arts was able to log the information digitally and cut down dramatically on the amount of paperwork they were generating. This project was a huge success as it saved a lot of time for the dental office and a lot of trees as they reduced the amount of paperwork that needed to be stored.

Bakery Web Design

When we received the call from a local bakery that they were interested in revamping their site, we were excited to discuss their project and find out if Ambaum could help. I set up a call with Kim, the main website contact at Seattle’s Favorite and we discussed a plan to design an eCommerce site so they could sell to both retail and bakery wholesale customers at the same time.

During the initial planning and scoping meetings, Kim and I determined that before we could get started on the new design, we needed awesome product pictures. Kim volunteered to take those pictures and they turned out great!

Once we had the pictures we set out to create a very simple design that uses a lot of white space to really show off the great product images. You can see the bagel product images, gourmet cookies and muffin top pictures (see image below) all turned out great and fit in nicely with the new design.


WordPress for Bakeries

Now that the design was nailed, it was time to turn our attention to the platform we were going to use for the site. We love WordPress as it allows our customers to update bakery items and product descriptions within the text editor, rather than having to get in there update html, css, php and all of the programming languages we use to create sites. WordPress was very easy for us to apply a custom design and it was the logical choice for us to build this new bakery website.

WooCommerce for Bakeries

WordPress was our answer for the core platform, now we needed an eCommerce platform! The obvious choice was to use WooCommerce as it integrates nicely into WordPress and allows us to do a number of customizations to the site. The plan was always to allow wholesale bakery customers to log in to the site, review products and purchase orders. There was also the need to have potential wholesale customers apply to become a wholesaler and then we needed a form (we use gravity forms for all our forms, and we love it) called the wholesale application form for their final approval. There was going to be a lot of customization and the way to do that was with WooCommerce Plugins.

Bakery eCommerce for Retail Customers

For retail customers, the goal was to show them an overview of all the different baked good categories when a user first entered the store. At the highest level these category pages need to show customers a large beautiful image of the product and also show the customer how many individual products were located in each cookie category (for example).

shop

Once the customer clicks on a category they can see all the products listed (an example image is the first one used in this post). After you click on a product, you land on the product detail page, in the example below this is the product listing page for 10 grain honey bagels:

product-bagel

Wholesale Experience for Bakery Customers

Retail customers get to see the full price of each item, but when a wholesale customer logs in they needed to see a $0 price for all items. Seattle’s Favorite wanted to keep their billing process intact and apply the wholesale customer’s unique pricing when they sent the invoice via Quickbooks. In addition, wholesale customers have multiple locations so we created a location field to go along with each order. When Seattle’s Favorite receives the order they can now see the physical location of the wholesale customers, this was very valuable especially for customers that had 10+ stores.

Custom Web Design for Cupcake and Bakery Websites

Are you looking to take your cupcake business online and create an eCommerce store? How about your bakery, is it time you started shipping your cakes throughout the country? If you want to learn more, send us an email or give us a call, Ambaum would love to help!