Get in Touch

Volusion to Shopify Plus: BulletProof Diesel Case Study

Ken and Gene Neal founded BP Diesel in 2002 and started a line of high-quality custom-made truck parts: water pumps, brake lights, oil systems, engine parts and much more. Gene handled the website and got BP Diesel started selling online on Volusion, but by 2019 they reached a point in their growth trajectory where they started to look around for a platform that could fully support them. Gene found Shopify Plus and then reached out to Ambaum to get started on scoping out the development of a new custom theme and migrating BP Diesel’s data. 

Scoping & Timeline  

BP Diesel had recently completed a site redesign and was not looking for us to help them with a complete redesign, but they did want some subtle design help on their product detail page. The client did not have an aggressive timeline for completing the project, they wanted to get through their 2019 holiday busy season and launch in spring of 2020. From start the finish the project took 8 months, but the last 2 months the client was pushing back the timeline to get some of their internal processes lined up to go live. Our typical timeframe to move a customer from Volusion to Shopify is 4-5 months to complete the redesign, build, migration and any customizations we need to develop. 

Custom Theme Build 

Ambaum developed the new BP Diesel Shopify Plus site on top of Shopify Theme Kit. Shopify Theme Kit is a command line tool that manages its connection using a private app. We were able to leverage our proprietary custom theme that includes a lot of pre-built sections, snippets, scripts, icons, and much more. Our starter theme gave BP Diesel the benefits of a professional theme and they also got the flexibility of building everything from the ground up to fully accommodate the look of their new store. The new theme for BP Diesel included the following pages: 

  • Home
  • Collection
  • Product Detail
  • About Us
  • Blog
  • Cart
  • Forms
  • Static Text Template Page
  • Mega Nav

Ambaum built the custom theme in a development environment and BP Diesel was able to view progress and give feedback through the process.  

Product Migration 

Ambaum helped BP Diesel moved their existing data from the last 10 years on Volusion to Shopify Plus. When the new site launched customers could login to Shopify Plus and see their past order data and view all historical information. In addition, we created a launch email to notify past customers about the launch so they could come check out the new site. The migration covered the following data elements 

  • Products  
  • Customers 
  • Orders 
  • Product Review Migration 
  • 301 redirects were created for the old Volusion URLs that pointed to the new URLs on the Shopify site

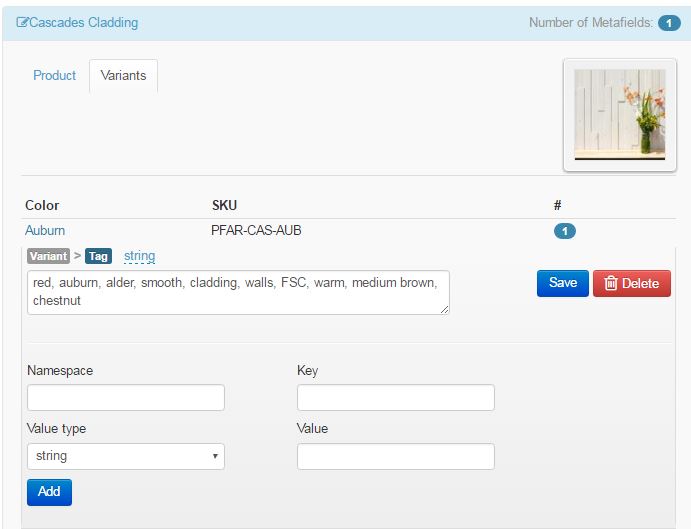
When we exported Volusion product data it was all lumped into one field and we needed to break it apart so we could setup products correctly in Shopify. Our team wrote custom scripts in PHP + we used the Shopify Product API to allow us to separate out products into tags, kits into tags, shipping to tags and products warnings to tags. Our script also allowed us to identify embedded You Tube and magazine hyperlinks so we could place them in Shopify metafields. The initial Volusion data migration did not bring over each order number and their ERP needed that so Ambaum setup a script to fix the relationship and update each of the orders with the proper number. 

Core Charges & Kits 

Some of BP Diesel are sold with a refundable core charge. When you add the product to the cart, you will see the core charge show as an additional product:


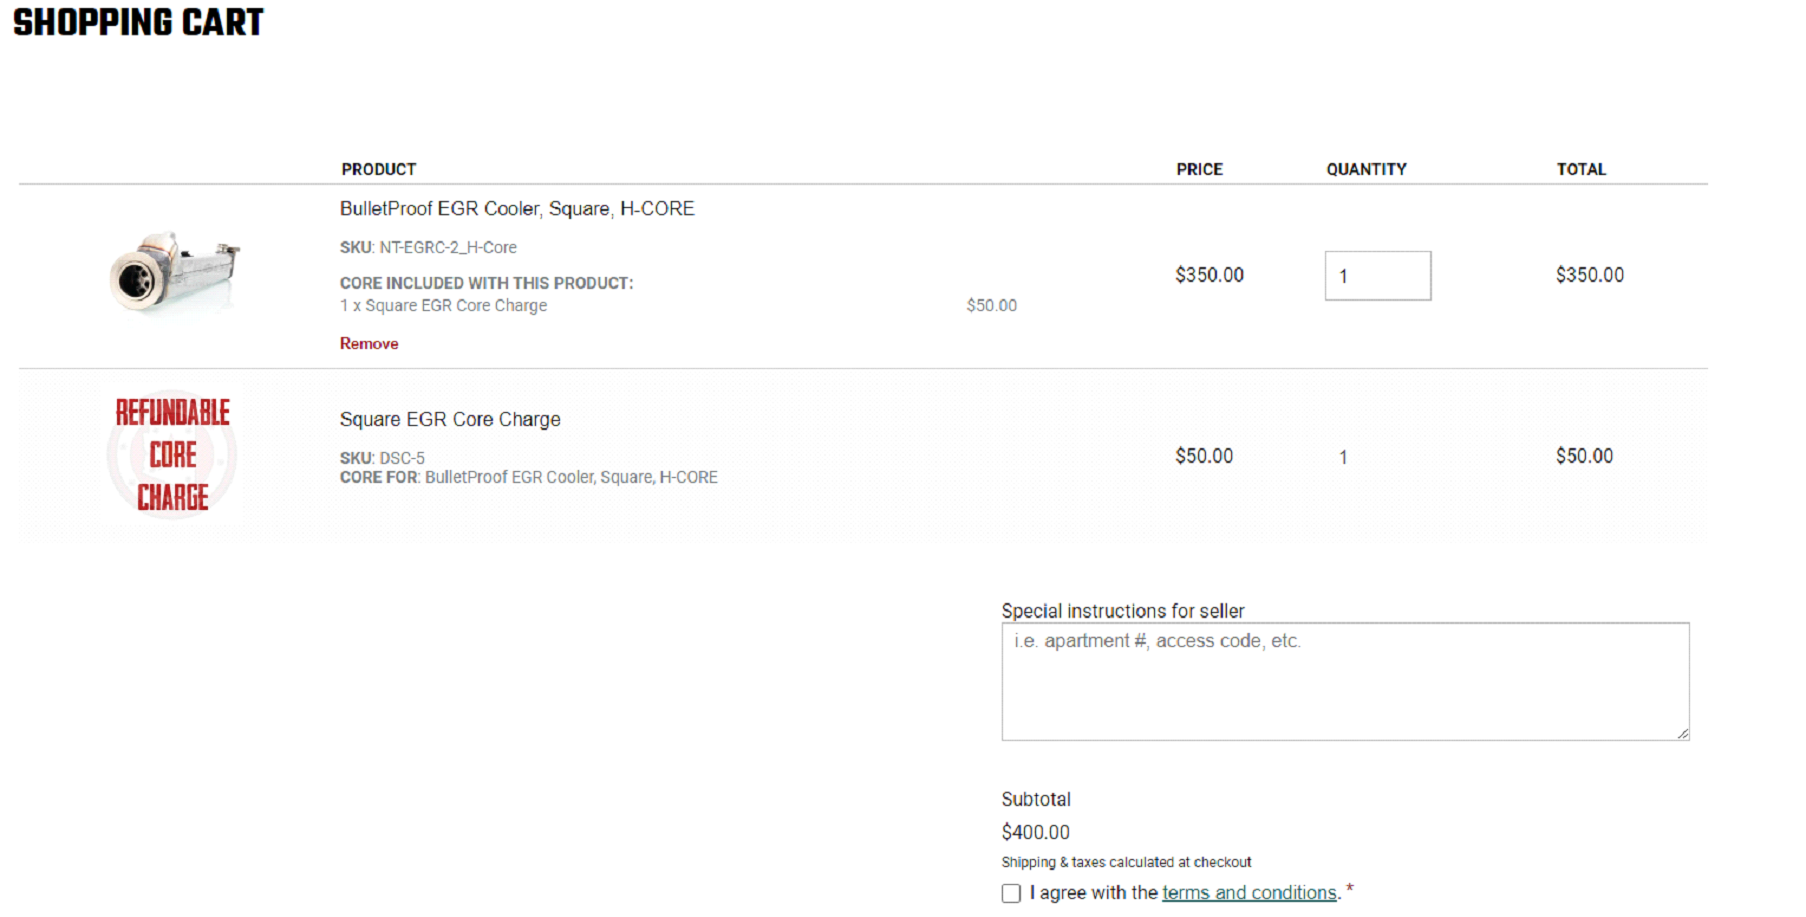
The customer is required to buy the core along with the part, but if they choose to the core can be returned to BP Diesel for a refund. We leveraged tags to make sure the approximately 10 products with core charges would show up on the product detail page and in the cart. Ambaum
also used Ajax calls to show different cores that were buried in kits with multiple products. 

BP Diesel sells kits which are bundles made up of many different individual products. On the product detail page of a kit we wanted to show each individual product that made up the kit, here is an example:

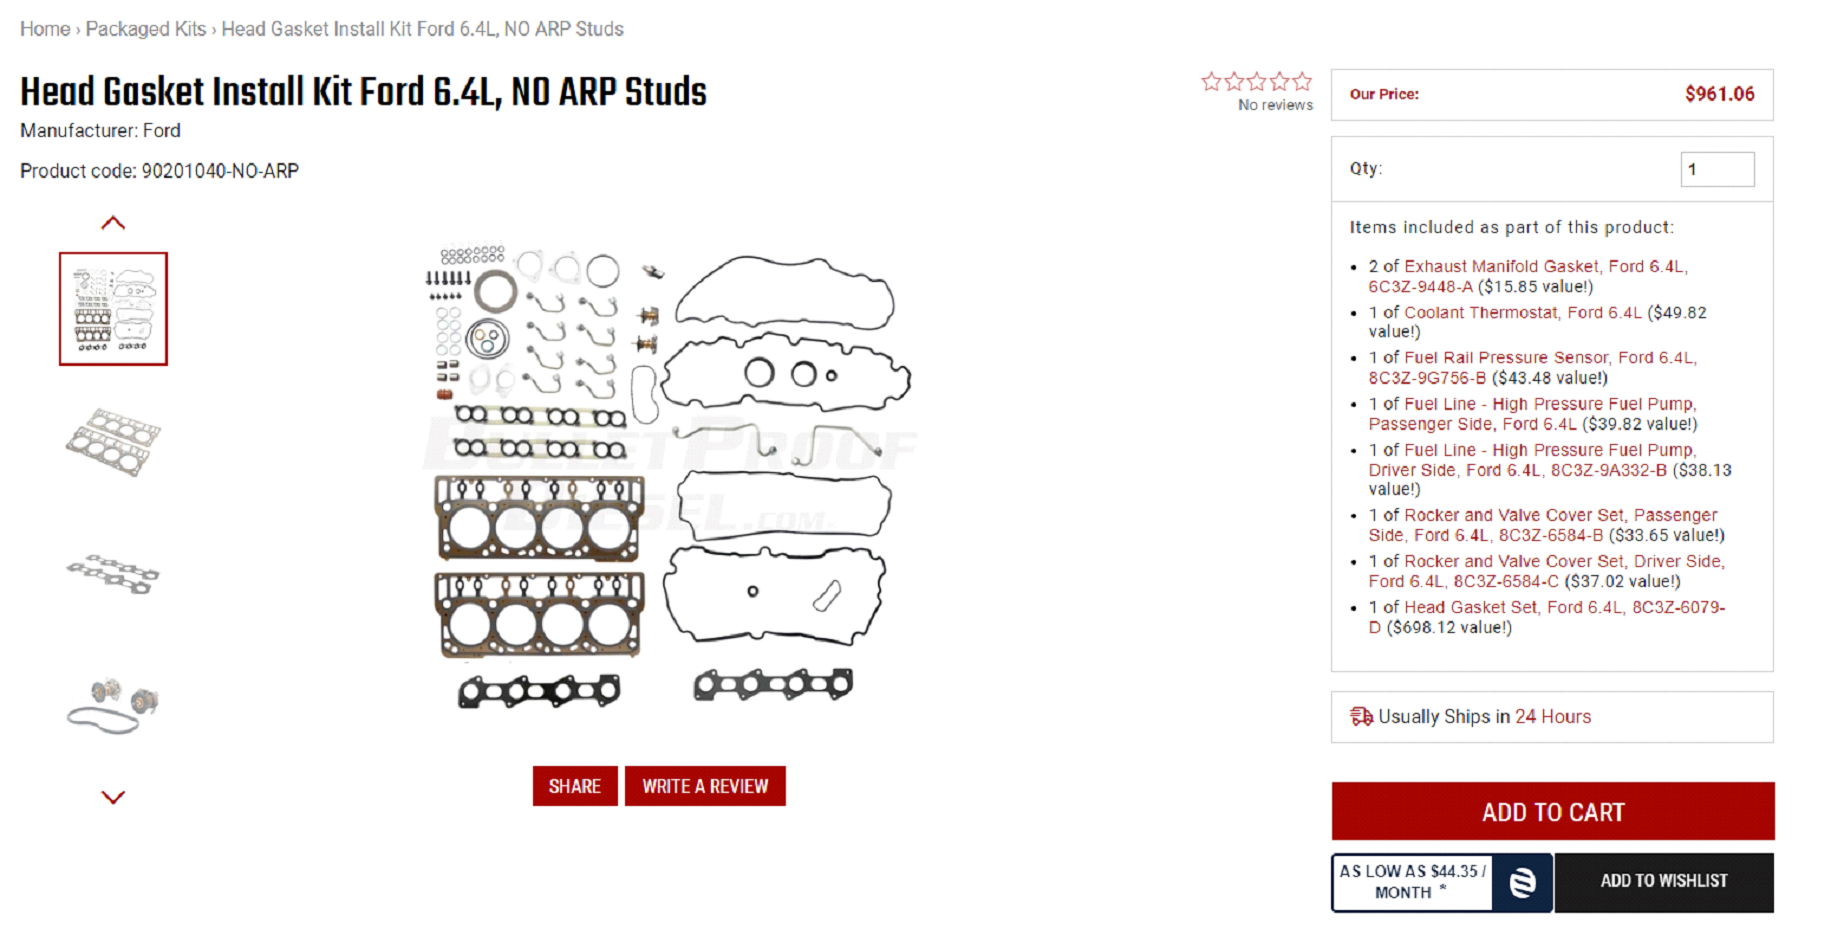
Also, when you add the kit to the cart it will show each of the child products. These child products are zerodollar product variants that are associated with the “handle” or the URL slug of each product. 

Filtering 

BP Diesel wanted custom filtering throughout the site and wanted it front and center on the home page. The ability to shop by vehicle, shop by product, select make, select model and select year were critical filters as that is how their customers think when they are looking for a particular automotive part. Ambaum worked with Gene and decided to use the Automotive Part Search app, which powers that front make, model and year filter on the home page. We needed to create robust filters for each of the collection pages so we leveraged the Product Filter and Search app to give BP Diesel customers a number of advanced product filters. We were also able to make the filters unique to particular collections to give BP Diesel a lot of flexibility for all their custom automotive products. 

Fully Hosted vs Self Hosted Ecommerce Solutions, Which One is Right for Your Company?

Fully Hosted vs Self Hosted Ecommerce Solutions, Which One is Right for Your Company?

If you are considering starting a business or choosing a new ecommerce platform, you should fundamentally understand how ecommerce platforms work.

If you are considering starting a business or choosing a new ecommerce platform, you should fundamentally understand how ecommerce platforms work. At the highest level all ecommerce solutions fall into two camps: self hosted solutions and fully hosted platforms. Each platform has pros and cons to consider and it’s important you understand the differences for your online business.

What Does it Mean When an Ecommerce Platform is Self Hosted?

A self hosted ecommerce solution is one where your company is responsible for the hosting. That means you would need to setup a server (in the cloud typically) and your store’s files and data would be maintained on that online server.

What Does it Mean When an Ecommerce Platform is Fully Hosted?

Fully hosted ecommerce solutions maintain your store’s files and data in the cloud. You would not need to setup your own server, the ecommerce platform is storing your data for you.

Examples of Both Types of Ecommerce Platforms

Fully hosted solutions are also commonly referred to as SaaS products (software as a service). Here are some common examples of fully hosted ecommerce solutions:

There are many self hosted platforms, but the two most popular are:

As you think through the correct platform for your store there are a number of features you must consider. For each of these features you will need to understand how they work on self hosted platforms compared to fully hosted platforms.

  • Design
  • Functionality
  • Server Maintenance and Backups
  • Credit Card Security and PCI Compliance
  • Site Uptime & Content Delivery Networks (CDN)

Getting Started with Design

On the major platforms listed above if you want to get started with your new store you will have a myriad of options for “themes” or ready made designs to get you rolling. If you want to customize the design of your store you can do that on a fully hosted solution just as easily as you can on a self hosted platform. If you want to do customization to the design of your store you are going to need to know front end programming: CSS, HTML and some JavaScript. Day to day maintenance of your products in your store can be accomplished with either a self or fully hosted platform no problem assuming everything was initially setup correctly.

Site Functionality

Self hosted solutions are a blank slate so you can customize them 100% to what you want.

Fully hosted solutions are hosted in the cloud and you don’t always get full access to everything you might be accustomed to if you are coming from a self hosted platform. However even with self hosted solutions there are often workarounds that will get you what you need. For example on Shopify there is a robust app store with over 1,500 public apps that will extend the functionality of your store. You can create a loyalty program, collect customer reviews, integrate email marketing and much more through a variety of free and paid apps. If you can’t find the perfect public app you need on Shopify you can always create your own custom app to give you the exact functionality your store needs.

Server Maintenance and Backups

If you go the self hosted route you will be responsible for managing your own server and backup process. You can choose to use a server hosted in the cloud, but you will need to perform regular server maintenance and upgrades to make sure your site stays up and is loading fast for your customers (to check your Google page speed score go here) . This work can be outsourced, but if you go the fully hosted route you won’t need to worry about server maintenance and backups.

There is no need to perform server maintenance for fully hosted solutions as your provider will take care of that for you. Many fully hosted solutions will also take backups, but even on a fully hosted solution you will want to consider setting up your backup process to make sure you cover the following: your theme, customers, products and order data.

Credit Card Security & PCI Compliance

If you choose a self hosted solution like Magento or WooCommerce you are going to have to make sure any credit card data you store is completely protected. Even if you choose a self hosted platform you will want to do everything you can to avoid storing credit card data, one common solution we see for this problem is to use something like Stripe Checkout. Stripe checkout allows your customers to store their data in Stripe’s servers and if you return to the store you can reenter your phone number to validate your information and quickly checkout. If you don’t use Stripe Checkout (or a similar service) it’s necessary to know the PCI Compliance rules to make sure your store is in compliance with storing financial data.

Fully hosted solutions will take care of your credit card security and PCI Compliance automatically so unless you do some unique and extensive customizations to your site you won’t want have to worry about this.

Site Uptime and Content Delivery Networks

Ensuring your site stays online is the #1 priority for self hosted sites. If your site goes offline you could lose out on a lot of sales and create a negative perception for your brand. Your server needs to be able to scale with traffic so that it doesn’t get overwhelmed with the volume of people making purchases all at once. The biggest peak days are often Black Friday and Cyber Monday and they are the last days you want your store to go offline. With a self hosted store you need to make sure your site stays online and you have contracted with a content delivery network (CDN) so your site loads quickly all around the world.

If you choose to build your store on a fully hosted solution your site goes down only if the entire SaaS platform goes down. There are ~500,000 stores on Shopify and if they all go offline Shopify is strongly incentivized to get them all back online quickly. Major SaaS ecommerce solutions often have built in CDN’s, Shopify uses Fastly to make sure your site is fast all over the glove.

Do you Already Have a Store?

If you are looking to migrate your business from one ecommerce platform to another it’s important you know what type of platform you are getting into. Ambaum has migrated stores from fully hosted to self hosted solutions, but the biggest trend we are seeing recently is companies moving from self hosted to fully hosted platforms. If you have any questions about ecommerce platforms, don’t hesitate to reach out!

Time is running out on Magento 1.x are you Prepared?

All Magento 1.x store owners will stop receiving support from Magento in 2018. When Magento 2 was released in 2015, Magento made it clear that they will provide 3 years of support to Magento 1.x users and then store owners would be on their own for updates and security patches.

Here is the scoop straight from Magento Tech Resources : “Use the latest version of Magento to ensure that your installation includes the most recent security enhancements.” Magento is very clear that when support for Magento 1.x runs out you are on your own.

When summer 2018 arrives what will that mean for my Magento 1 Store?

If you decide to stay on Magento 1 past the summer of 2018, you are accepting the following risks with your store:

  • No Security Patch Support
  • Unsupported Extensions
  • Increased Monthly Maintenance Costs
  • Difficulty Maintain PCI Compliance

Magento 1.x Security Support Stops

In 2018, Magento will stop releasing security patches for your store and you will need to support your code base in house or with external programming support. With no central authority releasing regular security patches there is an increased risk that your transaction and customer data could be vulnerable to hacking attacks.

Outdated Magento stores running older versions of the software are susceptible to scripting attacks. Hackers can use scripts to steal users’ credit card information and in late 2016 it was estimated that over 4,000 Magento store were left vulnerable to an attack.

Magento 1.x Extensions Unsupported

Support for Magento 1.x extensions will start to wane in 2018 and then accelerate into 2019 and beyond. Development companies that have built Magento 1.x extensions will have no incentive to maintain support for a dying platform and will sunset their older extensions. Many extensions have complex code that would require professional programming experience to update and maintain. In addition, when old extensions are not supported they can become susceptible to external security threats.

Increased Monthly Maintenance Costs

Running Magento requires you to manage your own server, CDN and website with a team of professional programmers. Most merchants outsource this work and pay significant monthly retainers to contractors to ensure their site is running smoothly and stays online. When the summer of 2018 comes along your monthly maintenance costs are going to go way up because you will now be responsible for your security updates and the maintenance of your extensions.

Difficulty Maintaining PCI Compliance

With Magento you will need to make sure you are compliant with the PCI Data Security Standards (PCI DSS). If your store is processing more than 20,000 ecommerce transaction levels a year, you will be required to meet the bar of PCI Compliance Level 3. There is significant work involved in meeting PCI Level 3 and you will need to bring in outside consultants to conduct security and vulnerability testing. Your security testing after 2018 will reveal security issues that were previously covered by Magento security patches. It will now be your responsibility to update the security vulnerabilities in Magento 1.x software to maintain PCI compliance.

What are my Options for Moving off Magento 1.x?

If you decide you want to move off Magento 1.x you have 2 primary options:

  • Upgrade to Magento 2
  • Move your Store to another Platform

Magento 2 is a substantial upgrade and it’s important you think through the pros and cons before committing to the best answer for your store.

Upgrade to Magento 2

If you are familiar with Magento 1.x your initial reaction is to upgrade to Magento 2 so you can receive support from Magento. However the upgrade from Magento 1.x to Magento 2 is significant and there are some issues:

  • Magento 2 Issues & Performance
  • Magento 2 Extensions are not all Compatible

Magento 2 has many known bugs and issues and new Magento 2 stores have reported extremely slow page speed times. With any new platform it takes time to stabilize and these issues will hopefully be ironed out over time, but your store may suffer initially after the upgrade.

Magento 2 doesn’t have all of the same extensions that exist in Magento 1 so when you go to upgrade you may be missing some core functionality.

Move your Store to another Platform

Moving to a new platform is a major decision, but if you are currently on Magento 1.x this is the time to consider a move. If you are going to re-platform your store you should consider moving to a fully hosted platform like Shopify Plus. Shopify Plus will help you:

  • Save money on license and server fees
  • Save time moving all of your customer, order and item data each time Magento releases a new version
  • Save time and money managing your own server

These are the primary reasons that many people are thinking of switching from Magento to Shopify Plus and now let’s do a detailed side by side comparison.

Magento 2 vs Shopify Plus Feature Comparison

Price and feature comparison of Magento to Shopify Plus based on a store with ~$10M in yearly sales.

 Magento 2Shopify Plus
Server & DatabaseSelf Hosted – MySQLCloud Based – Proprietary
License Fees/Cost*$4,000/month +$2000/month
Server & CDN Costs$1,000/month +Included
Security & SSL CertificationYour ResponsibilityIncluded
Maintenance HoursSignificantLimited
PCI ComplianceYour ResponsibilityIncluded
Feature EnhancementsExtensionsApps
Mobile FriendlyYes – with CustomizationYes – with Customization
Wholesale OrderingYes – with ExtensionsYes

*License Fees/Cost estimates based on $10M/year in ecommerce revenue.

We have created an in depth guide that compares Magento 2 to Shopify Plus, click here to get access to our free comparison and migration guide.

Are you currently on Magento 1.x and want to consider your options? Send us an email and Ambaum can help you find the best answer for your ecommerce store.

How to Improve Product Search on Shopify with Variants and Meta Fields

What was the business problem that the client faced?

One of our clients, windfalllumber.com, has dozens of variants of products which differ mainly  in color only. They wanted to improve the search ability on their site so that when a visitor searches for a particular color, all relevant results are returned. Also, the client wanted the search results to display individual variants, not simply their parent product, which is the typical Shopify search result.

Shopify by default only searches the product title and product description. This could cause a problem (no or incomplete results) if , for instance a visitor searches for “green” and the parent product of a “green” variant does not have “green” in the title or product description.

They needed a way to tag their variants according to likely color search keywords. Shopify does not provide the ability to assign tags to their variants, only the parent product. They needed an app to replicate the ability to add tags to variants.

MetaFields Editor by Webify Technologies

MetaFields Editor is a FREE and simple to use app that we frequently use as a general problem solver where Shopify does not allow the ability to add metafields (additional data) to a product or variant within the dashboard.

Within the app (screenshot below) we were able to add variant “tags” to specific variants that are helpful to pinpoint a variant during a search on the site. These are not only likely color keywords, e.g. “red, auburn, etc…” but other descriptive terms for texture, e.g. “smoothe”, or the variants practical use, e.g. “walls”.

metafields-editor

Metafields Editor does NOT work with Shopify’s search automatically. Custom coding needed to be added to the search results to search and filter by variant tag. However the alternatives to tagging variants by way  of metafields were far messier and utterly impractical for a variant search to work.

Consider another possible use for this app. In the Shopify dashboard, for any product you can only enter data such as title, description, sku, weight, collection and a few other items. However what if each of your products has an MSDS (material safety) pdf associated with it? Where would you enter the link to each product’s pdf in the dashboard? In the product description? Perhaps, but that’s not ideal.

With the Metafields Editor, you would simply go to the app, select the product (or variant) you wish to add the pdf link to,  and then add a namespace, select a value type, add the key of the metafield- “pdf”, in this example- and the value of the metafield – a url to a pdf file on the server.

In your theme’s templates, metafields values can easily be retrieved using roughly the following liquid syntax: {{ product.metafields.namespace.key }} or {% assign someValue= product.metafields.namespace.key %} or

{{ variant.metafields.namespace.key }}

What other apps did you look at besides?

There are other metafield apps out there such as Product Metafields +   and Metafields2. Both of these are premium yet affordable apps. They could no doubt allow us to solve our variant metafield problem and have a few more custom features than Metafields Editor. However once again, Metafields Editor is free and simple. When we can solve a problem using something that is simpler, we go with simpler.

Did you consider building something custom in the liquid template?

As mentioned above, we did need to considerable coding in our search results template to use these new variant tag metafields to produce relevant results.

In our code, we had to first off, query for all of our stores products. As we ‘looped’ through each product, we had to loop through each product’s variants. With each variant, we checked against the variant’s metafield whose key is “tag”, and then checked to see if the value of that metafield contains the keyword from the user’s search (whatever the user entered into the site’s search box). If there was a match for any particular variant, we displayed the variant’s featured image and title with a link to the parent product’s page with the variant’s id affixed to the url.

This is quite a departure from Shopify’s typical product search, which typically displays only the parent product of variant that matches the search, but not the matching variant itself.

Did the app solve all of the client problems? Any issues once you setup?

In summary, we were able to provide for the customers request: to search for individual variants by way of variant “tags”. The only issue for our client and any of our client’s who’ve used this metafield app, is that they cannot simply add the metafields to the products or variants directly in the Shopify dashboard under the product edit pages; it involves an extra step. Perhaps someday Shopify will finally add the ability for shop owners to do that. Metafields for products and variants do exist behind the scenes, but you have to use an app to add and edit them.

Urban Smart Bellevue

We recently undertook and completed a large project for the City of Bellevue and Puget Sound Energy called Urban Smart Bellevue. The Urban Smart campaign was created to raise awareness about energy conservation for businesses in metropolitan areas. Our ultimate goal for the project was simple: take a design and turn it into a functioning website. However, with most large scale projects, there was a lot of coordination and communication needed to complete the site.

urbansmartbellevue

The Design

After we received the design, we created a development site on our server with a fresh WordPress installation and starting chopping up the design files. We went through our normal process of starting from the top down on the design, from there we decided to take a look at unique features of the site that would require extra time to implement.

The Animated Graphic

The most unique feature on the Home page was the third section down labeled, “Energy-saving actions, powerful results.” We took this photo from its .jpg format and sliced each individual piece out into it’s own .png. Then, using some jQuery, we set a scroll point so when the viewer reached a certain point on the page, the images would start sliding into place. To create the sliding effect, we primarily used CSS transitions and absolute positioning. The only Javascript we used was to start the sliding action, set timers on each image to dictate when it would start to slide into place, and then update the absolute positioning to determine the end position of the image. Using the opacity, transition, and absolute positioning properties of CSS is what allowed us to create the fade-in and sliding effects on the images.

The Custom Posts

We added a slideshow plugin and then used a parallax jQuery plugin to add the parallax effect on the image above the footer. The rest of the design for the Home page was pretty straightforward. One of the more complicated aspects of building a site for a client is to create ways for them to easily input new content to the site without needing any coding experience. While WordPress provides a great interface to do this with standard page templates, when you are working with a custom design where  you can’t just place all of the content in a block of text, you need to get a little creative with plugins or your code.

One of the sections on the Urban Smart site where we needed to add some custom content management was in the Upcoming Events and News Feed sections. The content in these sections is updated in one section of the WordPress dashboard and then automatically updates both the Home page as well as the News and Events page. We did this using a custom post type plugin which generates a new tab in the dashboard for News and Upcoming Events. From there, the client can easily input new content and that content is added to the site when they update.

The Stuff Behind the Scenes

(you can skip this section if you aren’t interested in how this is done)

When we use the custom post type plugin. Essentially what we are doing is using the plugin to create a new post in the database with a unique post type. In this case we used it for the Upcoming Events and News Feed post types. Each of the post types has custom fields that are associated with it. So when the data is stored, it is tied to to the specific post type. When you want to output this data, you will need to query the post type by creating an array that stores the post type information and a loop that cycles through the array. Within the array, you can apply parameters to filter the data as needed such as the number of posts that are returned in the array, the ordering of the posts (ASC, DESC, etc.), as well as custom fields within the post type.

Here is an example of an array and the query:

$args = array('post_type'=>'custom-post-type', 'order' => 'ASC', 'posts_per_page' => 3);
query_posts($args);

Once you have created your array and loop, you will need to call the custom field data within the loop using the get_post_meta WordPress function. Here is a sample of code that we used to store the data for the location of an Upcoming Event:

$time = get_post_meta($post->ID, 'wpcf-custom-field-slug', true);

This PHP variable stores the value for the specified custom field which you can then add to your HTML to dynamically output the data as you can see in the Upcoming Events section of the Home page.

about-us

The Back Pages

After we finished the design for the Home page, we needed to finish designing the back pages. These pages were, and generally are, less sophisticated and complex than the Home page. However there was still some customization needed to meet the design. As mentioned earlier we needed to use the News and Upcoming Events custom post types to update the content on the  page. We also needed to create some custom fields that would appear on the About Us and the How it Works pages. To make the content easy to update, but still fit the design, we needed to use custom fields for the different sections of the pages. If you look at the About Us page, you can see how the content is split into two section, the top section with the white background, and the lower section with the blue background. In this case, we needed to create two separate content sections in the dashboard where the client can add content for each section. We also needed to create custom page templates for each of the pages since they each have a unique design. With a simple site, you can generally just use a default template for the back pages as they will all look the same structurally and just the content itself changes from day to day. With this site, the design was intended to make each page stand out in its own way. Generally, the more complicated the design, the more you will need to use custom fields to simplify the content management for a non-technical client.

The Responsive Design

As with all of our sites, we needed to make this site responsive. However there was a little more pressure to get the design right with the Urban Smart Bellevue project because we were provided with such a detailed design for the full site, but we weren’t given any information for the responsive design. Luckily, we are rarely given a responsive design so we have a lot of experience converting a desktop design of a site to the mobile version without much instruction. Sometimes when you are reducing the size of the screen, you as a developer have to sacrifice some of the content as it won’t all fit in a mobile design. Fortunately for us, the design we were given was designed in such a way that we were able to fit all of the content into the responsive design. Check the site out on your phone or tablet and see what you think of our responsive design.

The Summary

We managed to finish the site in time for them to launch their campaign. There is always a sense of accomplishment when you finish any project, but this one was a little more special than normal because it was a big project for a big client with a small amount of time to launch the site.

Becoming a Shopify Expert

As the online retailing market continues to grow, so too does the demand from our clients to create an online store for their businesses. While we are very confident in our ability to create an e-commerce store that not only looks amazing, but is equally as functional, we wanted to take our e-commerce skills to the next level, particularly with Shopify.

Shopify has a program called Shopify Experts. In order to become an Expert, you must submit an application containing 5 stores that you have created as well as descriptions and code examples of the work. This seemed like the perfect opportunity for us to not only prove to ourselves what we already knew, but to also gain certified validation that we are indeed Shopify Experts.

As part of our application, we had to decide not only which stores to include, but what specific examples of code we wanted to show Shopify to prove our expertise. Here is one example from Oxygen Plus:

The client didn’t like the default image swap or lightbox treatment of images on the single product page so we just adapted and recreated it for jcarousel.js

<div class="jcarousel">
<ul>
{% for image in product.images %}
<li><img itemprop="image" src="{{ image | product_img_url: "large" }}" alt="{{ product.title | escape }}" /></li>
{% endfor %}
</ul>
</div><!-- end of jcarousel -->{% assign numImages= product.images | size %}
{% if numImages > 1 %}
<div class="jcar-controls">
<span class="jcarousel-control-prev jcar-control"><span class='arrow'><img src="{{ 'jcar-nav-left.png' | asset_url }}" /></span><span class="symbol"><img src="{{ 'jcar-nav-o.png' | asset_url }}" /></span></span> <span class="jcarousel-control-next jcar-control"><span class="symbol"><img src="{{ 'jcar-nav-plus.png' | asset_url }}" /></span><span class='arrow'><img src="{{ 'jcar-nav-right.png' | asset_url }}" /></span></span>
</div>
{% endif %}
</div>
<!-- end of jcarousel -->

What this code is doing is mixing the liquid code of Shopify and adding in some jQuery to create a carousel of images. The initial statement is creating a list using a for loop to display the images. The outer div with the class “jcarousel” indicates to the JavaScript that this is going to be the carousel. The next statement looks at the total number of images in the carousel and then checks to see if there is more than one image displayed. If there is, then the carousel navigation buttons are displayed as well.

While Shopify has a ton of very cool features right out of the box, there is always going to be something that the client requests that is not provided by Shopify so you either need to find an app that will do it, or create it yourself. In this case, we decided that we could create it so we put our Shopify expertise to work and created a nice jQuery carousel for our client.

One great thing about using Shopify as an e-commerce platform is that they store a lot of your product information behind the scenes, so you just have to know how to access that information to add special features to your store. On our site, Seattle Cedar, we have a minimum purchase price to receive free shipping. We wanted to create a way to notify our customers when they add a product to their cart if they were below the minimum purchase price for free shipping and how much more they would need to add to become eligible.

Here is the code that we implemented:


{% capture carttotal %}{{ cart.total_price | plus: product.price }}{% endcapture %}
{% assign carttotal = carttotal | plus:0 %}{% if carttotal and carttotal < 25000 %}<div class=”free-shipping-notice” style=”display: none;”>Your cart total is {{ cart.total_price | plus: product.price | money }}, to qualify for Free Shipping, you must add {{ “25000” | minus: carttotal | money }} to your cart.</div>{% endif %}

What this code is doing is pulling the current cart price and storing it in a variable. Then it adds the current product price to that variable. After the cart and product price are totaled, we compare that number with the number 25000 which represents our minimum purchase price. If the value of ‘carttotal’ is less than 25000, then the notice is displayed notifying the customer that they are currently not eligible for free shipping as well as how much more they would need to spend.

These are just a couple examples of the many ways that we have been able to apply our expertise within Shopify to meet a client’s needs. Our ultimate goal is to help clients to create successful online stores and becoming Shopify Experts is another step towards that end.

Bakery Web Design

When we received the call from a local bakery that they were interested in revamping their site, we were excited to discuss their project and find out if Ambaum could help. I set up a call with Kim, the main website contact at Seattle’s Favorite and we discussed a plan to design an eCommerce site so they could sell to both retail and bakery wholesale customers at the same time.

During the initial planning and scoping meetings, Kim and I determined that before we could get started on the new design, we needed awesome product pictures. Kim volunteered to take those pictures and they turned out great!

Once we had the pictures we set out to create a very simple design that uses a lot of white space to really show off the great product images. You can see the bagel product images, gourmet cookies and muffin top pictures (see image below) all turned out great and fit in nicely with the new design.


WordPress for Bakeries

Now that the design was nailed, it was time to turn our attention to the platform we were going to use for the site. We love WordPress as it allows our customers to update bakery items and product descriptions within the text editor, rather than having to get in there update html, css, php and all of the programming languages we use to create sites. WordPress was very easy for us to apply a custom design and it was the logical choice for us to build this new bakery website.

WooCommerce for Bakeries

WordPress was our answer for the core platform, now we needed an eCommerce platform! The obvious choice was to use WooCommerce as it integrates nicely into WordPress and allows us to do a number of customizations to the site. The plan was always to allow wholesale bakery customers to log in to the site, review products and purchase orders. There was also the need to have potential wholesale customers apply to become a wholesaler and then we needed a form (we use gravity forms for all our forms, and we love it) called the wholesale application form for their final approval. There was going to be a lot of customization and the way to do that was with WooCommerce Plugins.

Bakery eCommerce for Retail Customers

For retail customers, the goal was to show them an overview of all the different baked good categories when a user first entered the store. At the highest level these category pages need to show customers a large beautiful image of the product and also show the customer how many individual products were located in each cookie category (for example).

shop

Once the customer clicks on a category they can see all the products listed (an example image is the first one used in this post). After you click on a product, you land on the product detail page, in the example below this is the product listing page for 10 grain honey bagels:

product-bagel

Wholesale Experience for Bakery Customers

Retail customers get to see the full price of each item, but when a wholesale customer logs in they needed to see a $0 price for all items. Seattle’s Favorite wanted to keep their billing process intact and apply the wholesale customer’s unique pricing when they sent the invoice via Quickbooks. In addition, wholesale customers have multiple locations so we created a location field to go along with each order. When Seattle’s Favorite receives the order they can now see the physical location of the wholesale customers, this was very valuable especially for customers that had 10+ stores.

Custom Web Design for Cupcake and Bakery Websites

Are you looking to take your cupcake business online and create an eCommerce store? How about your bakery, is it time you started shipping your cakes throughout the country? If you want to learn more, send us an email or give us a call, Ambaum would love to help!

WordPress: Using the Types and Options Framework plugins as building blocks for your website

Plugins are an essential part of creating ease-of-use through the WordPress dashboard. There are thousands of plugins available with more created every day. While we could create plugins ourselves (and have!), we like to show our appreciation for other developers by using the plugins they have already created. Here are a couple of the core plugins that we like to use on almost all of our sites that we build.

Types

The Types plugin is great for clients who need content to be styled and displayed a certain way, but also need to be able to add, edit, and delete that content easily. We are able to create a custom post type which is displayed as a menu item in the dashboard. Let’s say, for example, that the client is a realtor who has several properties for sale. They need to be able to add/edit/delete properties easily, however, they don’t want to just add all of the information for the property in a text block. They want it to be styled in a certain way that is not practical through the standard WordPress WYSIWYG editor. We are able to give them field inputs using the custom post type and then call that information into the code and manipulate it to display however we want it to.

types-dash-2
Here is an example of how you input the content in the dashboard.
types-sc
This is how the content is output on the website. This would be nearly impossible to do through the standard WSIWYG editor in WordPress

Options Framework

Options Framework is another plugin that we use to simplify process of adding and editing of content to a website. With the Options Framework, you can edit much more specific content than the Types plugin allows. For instance, we have used it to allow clients to easily edit the footer information on their website. After installing the plugin, we have to go into the options.php file and create the field, then we add a snippet of code to the footer.php file:

of_get_option('footer-text');

This provides the client with a simple text input in the dashboard where they can add copyright information, a link to their privacy policy, or anything they want to appear in the footer. The uses for this plugin are practically limitless.

options-fw
The Options Framework allows you to edit your Theme Options in the dashboard. Here you can add specific content without having to go into the .php files.

With thousands of plugins available, there is a good chance that you can find the one you need for your feature or function. Whether it is integrating Google Analytics or adding a slideshow, we use plugins not only to make our jobs easier, but to make it easier for the client to manage their website.

WordPress: Content Management System

This is the first in a series of articles discussing WordPress and it’s functionality as a content management system.

As a web development firm, we take great pride in creating websites that not only look amazing, but are practical for our clients. We could start with nothing and build the entire site from scratch, and while it would still look amazing, as soon as we handed it over to the client, they would have no idea what to do with it.

WordPress allows us to hand them a product that they can then go in and update and feel that they are actually getting some added value beyond the initial design and build of their site. While there are cases where we might not use WordPress due to a request by the client (such as an e-commerce site), for the most part, we like to use WordPress because of the ease-of-use and huge community of support.

The Dashboard

The WordPress dashboard acts as a kind of “middle-man” between the code and client. For instance, it allows a non-tech user to login and update content on a page without actually having to go into the code files and write some HTML. While WordPress, by default, makes it very easy to navigate and utilize the dashboard, we as developers can take it step further by using custom themes, plugins, and our ability as coders.

Custom Themes

We are able to build custom themes because of our familiarity with WordPress. These custom themes can be tailored to almost any need or design requested by the client. Whether the client has a product list such as Seattle Cedar where the products all need to be categorized and displayed in a certain order, or this RORR site where there are a lot of custom functions and features built in such as a licensing agreement pop-up, we are able to create themes that are tailor-made for our client’s needs.

This pop-up was built into the theme based on the needs of the client.

The pop-up pictured above serves a specific purpose that was requested by the client. They wanted to make sure that none of the downloadable content on a specific page would be clickable without the user first accepting the licensing agreement. To do this we actually used WordPress’ default page template, but we needed to know if we were on a certain page so we modified the template to detect the page using a built-in WordPress function, is_page(). Depending on the page, if we wanted the pop-up to appear, we used an include statement to add the pop-up to the page. Using a JavaScript function, we were able to generate the pop-up using an on-click function. Essentially what it says is when a user clicks one of the links, they are then prompted by the licensing agreement. If they accept, they are able to download the files. If they decline, they are redirected to the home page. The final key component of our function was to make sure that once they accepted the agreement, they wouldn’t have to go back through and accept the agreement again during that browser session if they were to click on another downloadable file.

This is just one example of how we customize a page template within a custom theme. Rarely do we encounter a client that just wants a plain, cookie-cutter website so we use custom themes because they give us the flexibility to meet all of the client’s needs.